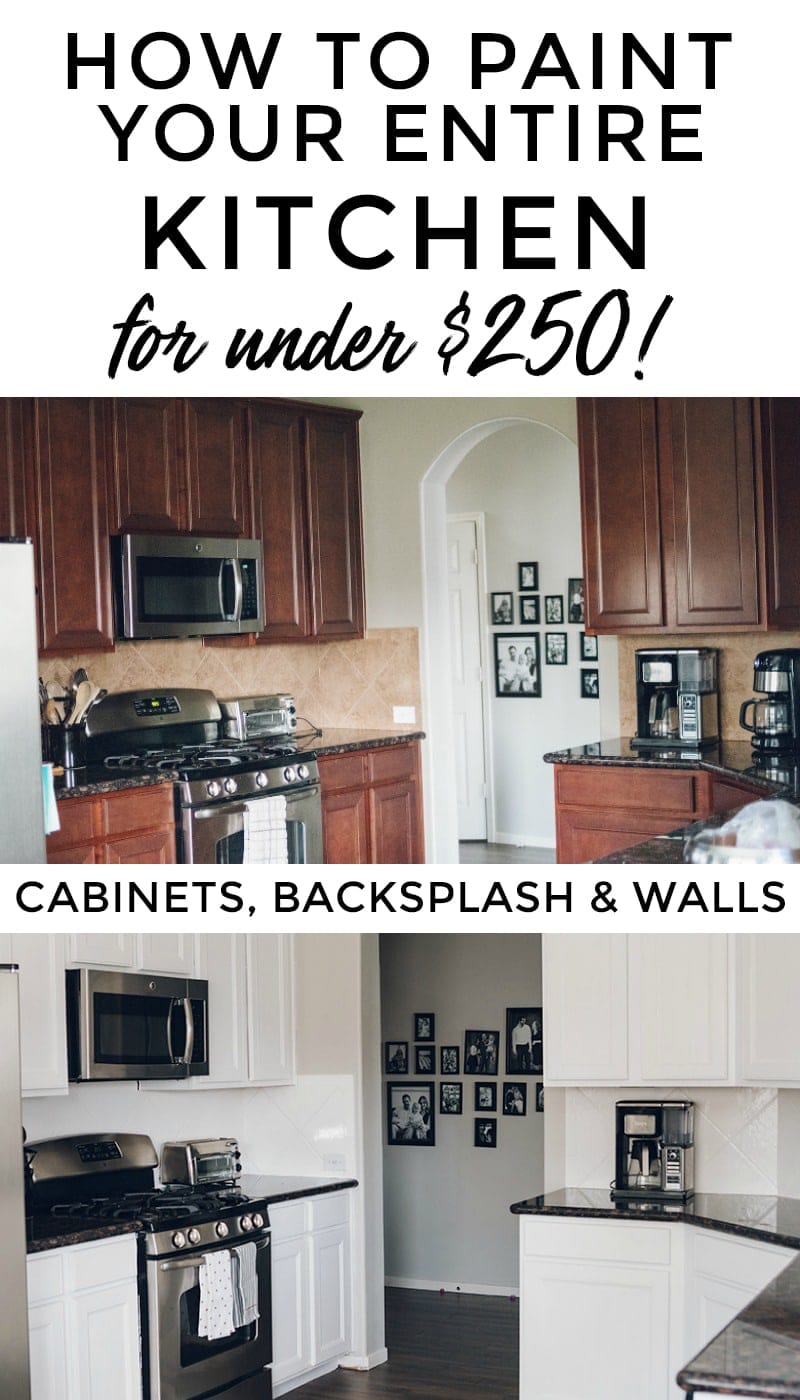
How I Painted My Entire Kitchen (Including the Backsplash!) For Under $250

Itching to paint your kitchen but on a budget? See how I painted my entire kitchen including the walls, cabinets, and backsplash for under $250!
This past summer, I undertook the DIY project of the century and painted my entire kitchen, inducing the cabinets and the tile backsplash, by myself (well, about 95% of it by myself – but more on that in a minute). I have been itching for a renovation in my kitchen, and I just went for it.
We bought our house in 2011, and dark cabinets were all the rage. Now it feels like a dungeon in there, especially since we’ve brightened up so many other spaces in our house. Last year, we did a huge remodel in our home and installed wood-look tile in the entire first floor, and did a complete master bath renovation. Last year’s renovations were a huge expense and we just can’t finance anything else for a while.
In an ideal world, I’d love to do a total remodel in my kitchen. Reconfigure some things, knock some walls down, put a big island in, etc. To hold me over, I was determined to freshen up the space with some paint. I was about to be a baller on a budget. And I was, friends. Call me kitchen baller on a budget.
The TLDR: If I can do it, so can you. It is tedious but worth it.
How long did it take?
It took me about 3 weeks to complete the entire project. I had the kids home for the summer and I still needed to work from home. Painting the backsplash is the shortest time commitment (and also time sensitive – must be done in one day). You could easily knock this project out in a long weekend if you had help and time. I had neither (for the most part). I told myself I would finish before my daughter Caroline’s birthday weekend. Well, friends, I finished ON her birthday. So I win.
What all did you paint in your kitchen?
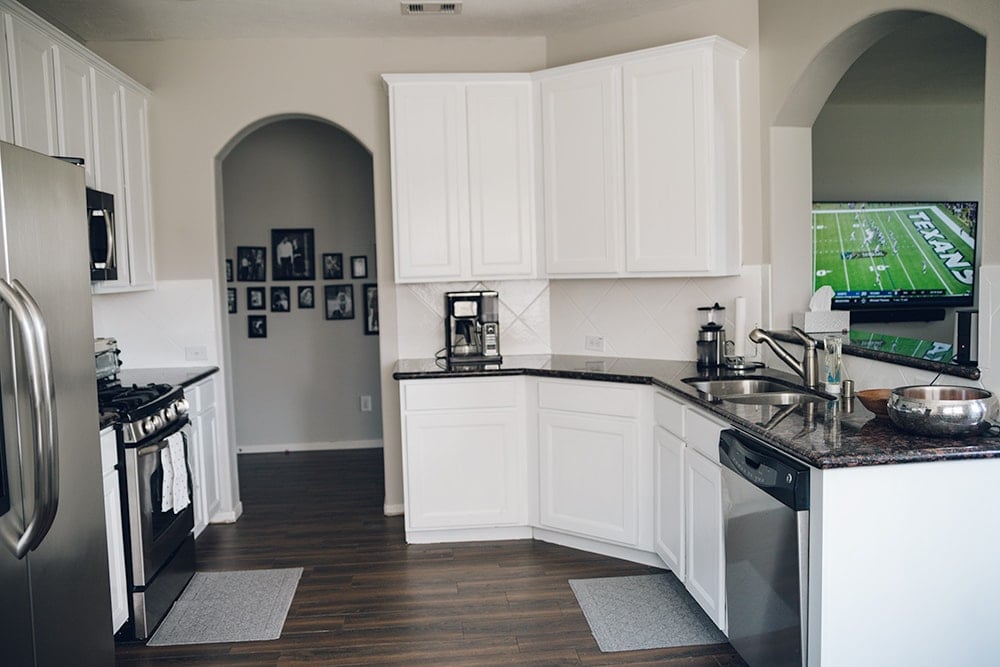
My cabinets, tile backsplash, and walls.
Now, let’s get into all of the details of each aspect of this project! I’m going to tell you exactly what I did to paint, and how I did it.
Painting the Walls
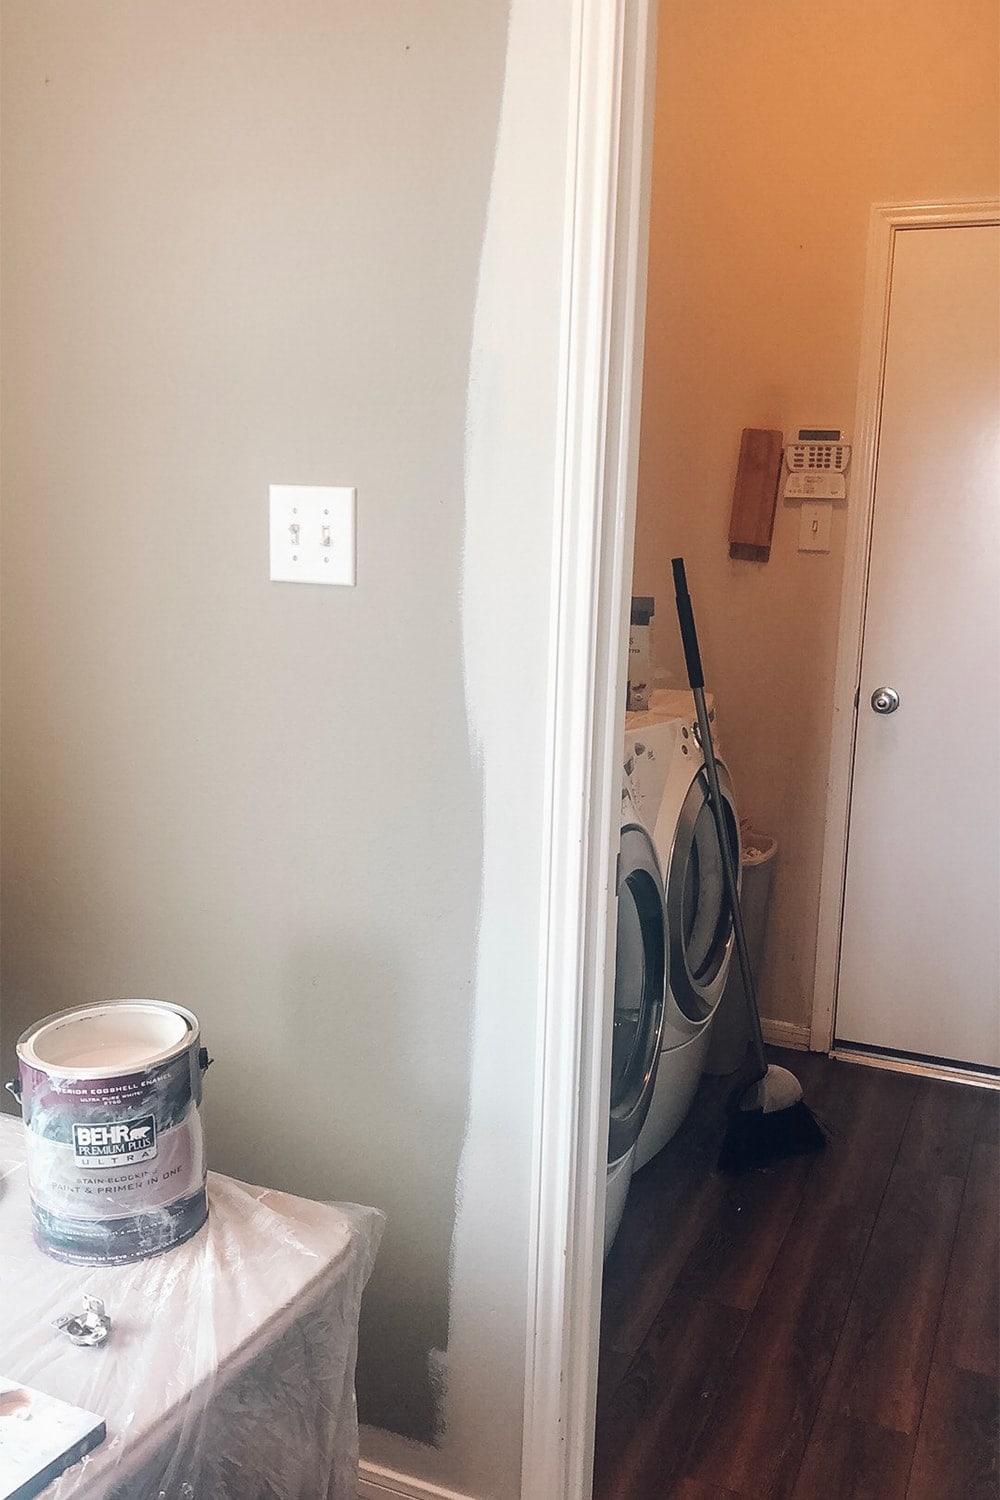
First, the easy part – the walls. I used Sherwin Williams Agreeable Gray in the space – the color we have almost everywhere else in our house. It’s very neutral and almost beige-gray. I don’t like grays that pull too blue, and this one never does. It always looks perfect in any lighting situation. I took my kitchen walls from a much darker taupe down to the Agreeable Gray color.
How I Painted My Kitchen Cabinets without Sanding
The most tedious part for sure was the cabinets. Here are all of the supplies I used to paint my cabinets.
Cabinet Painting Supplies
- Rust-Oleum Cabinet Transformations Kit in Pure White
- 1 Gallon of Behr Premium Plus Ultra Satin Finish in Pure White
- Paint brushes
- Mini paint rollers and extra roller heads
- Painter’s Tape
- Plastic tarps
- Tables
- Screwdriver
- Rag
My Experience with Rust-Oleum Cabinet Transformations Kit
Let’s first talk about the kit – the Rust-Oleum Cabinet Transformations Kit. This is a kit that comes with a deglosser (you do this first instead of sanding cabinets), a bond coat (the actual color the cabinets will be), a protective topcoat, and an optional glaze (I did not use this). The kit is very user-friendly and straightforward. I did a ton of research beforehand and watched a lot of videos on this kit before using it the first time. I definitely recommend you do this! Get on YouTube and search for people painting their cabinets dark to white with the kit.

The kit comes in various colors. You must get the bond color tinted, even if you are buying the Pure White kit (which is what I bought). If you buy it online from HomeDepot.com, you’ll need to get it tinted in store. Weird, I know. Your best bet is to locate it online to make sure it’s in stock and then purchase in store.
The Rust-Oleum kit was something I was familiar with. I used it last year to paint our bathroom vanity in master bath and downstairs half bath. I started out painting our master vanity white (the color that came in the kit) but didn’t like the way it looked in the space, so I went and bought a small amount of Sherwin Williams Ellie Gray (actually it was the Behr Premium Plus Ultra from Home Depot tinted to match Ellie Gray), and then sealed it with the top coat in the kit. It turned out amazing. One year later, it’s holding up amazing. No chips.
Our half bath vanity is holding up well with the Pure White color, too.
This gave me the confidence to use the kit on our kitchen. I knew the kit performed well for our bathroom vanities and held up, so I just went for it.
IMPORTANT: For me, the Rust-Oleum kit did not have enough bond coat paint for me to do my entire kitchen (my cabinets needed 4 coats), so that’s why I went out and purchased a gallon of the Behr paint. The color and finish of Behr Premium Plus Ultra Satin Finish in Pure White matched perfectly. (Another note: I did have paint left over from the gallon I purchased.) It’s a much more cost-effective way of completing this project instead of going out and purchasing another kit. I had enough deglosser and top coat for my entire kitchen, just not enough actual paint.
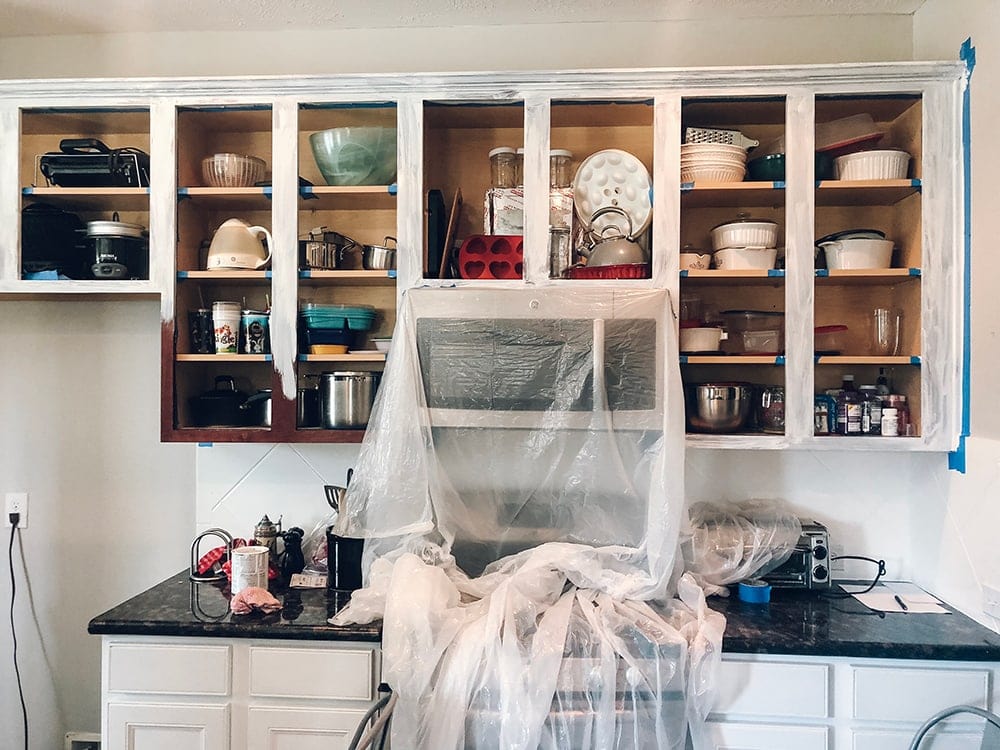
I didn’t want my house to be a wreck and my kitchen to be unusable, so I painted all of the cabinets in sections. I did all of the work in my dining room on tables with plastic tarps, so that it was out of the way but still in the nice air conditioned house.
My workflow for painting the kitchen cabinets
I painted my cabinets in sections so that I was not taking off over 20 cabinet doors at once. I did about 8 cabinet doors at a time. This really helped the kitchen stay usable and not be a disaster. I was also able to fit whatever I was painting in the dining room, so I did not have to sweat painting outside.
Here’s the order of how I painted my kitchen cabinets.
- Tape off the frame of cabinets
- Number all cabinets with painters tape and sharpie
- Remove hardware and put all pieces into ramekins
- Set up all the cabinet doors in a configuration, take the painters tape off and place next to the doors so I still knew which door I was painting
- Degloss frame
- Degloss cabinet doors
- 4 coats of paint (yes, the cabinets and frames needed a full 4 coats)
- Top coat
- Let top coat dry 12 hours
- Put doors back on
- Repeat per section
Here’s how the process looked when I got to the last section of my project!
Here was my work setup in my dining room. I pulled in a bunch of folding tables and tarps and painted all of the cabinet doors in there.
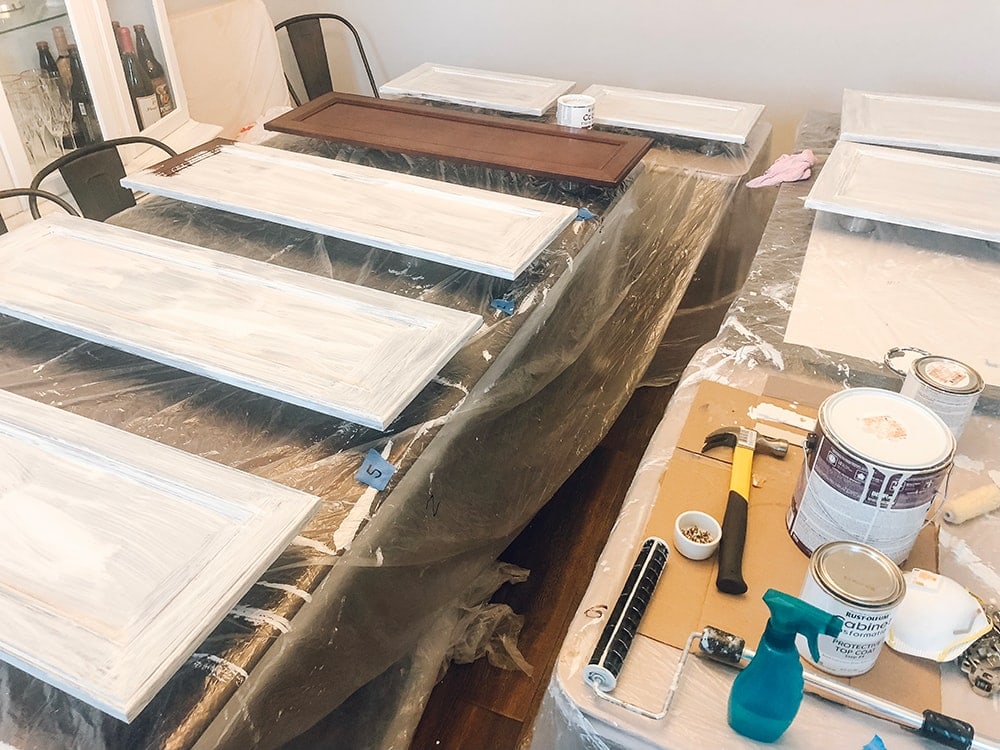
One thing that was extremely helpful was to set the cabinets on small plastic cups to elevate the doors off of the table. It made life much easier to paint, wait an hour, flip, paint, wait an hour, flip, paint…

My cabinets ended up needing 4 coats of the white paint to look completely even. If they only needed two coats (like the instructions suggested), it would’ve taken less time.
How to Paint Tile Backsplash
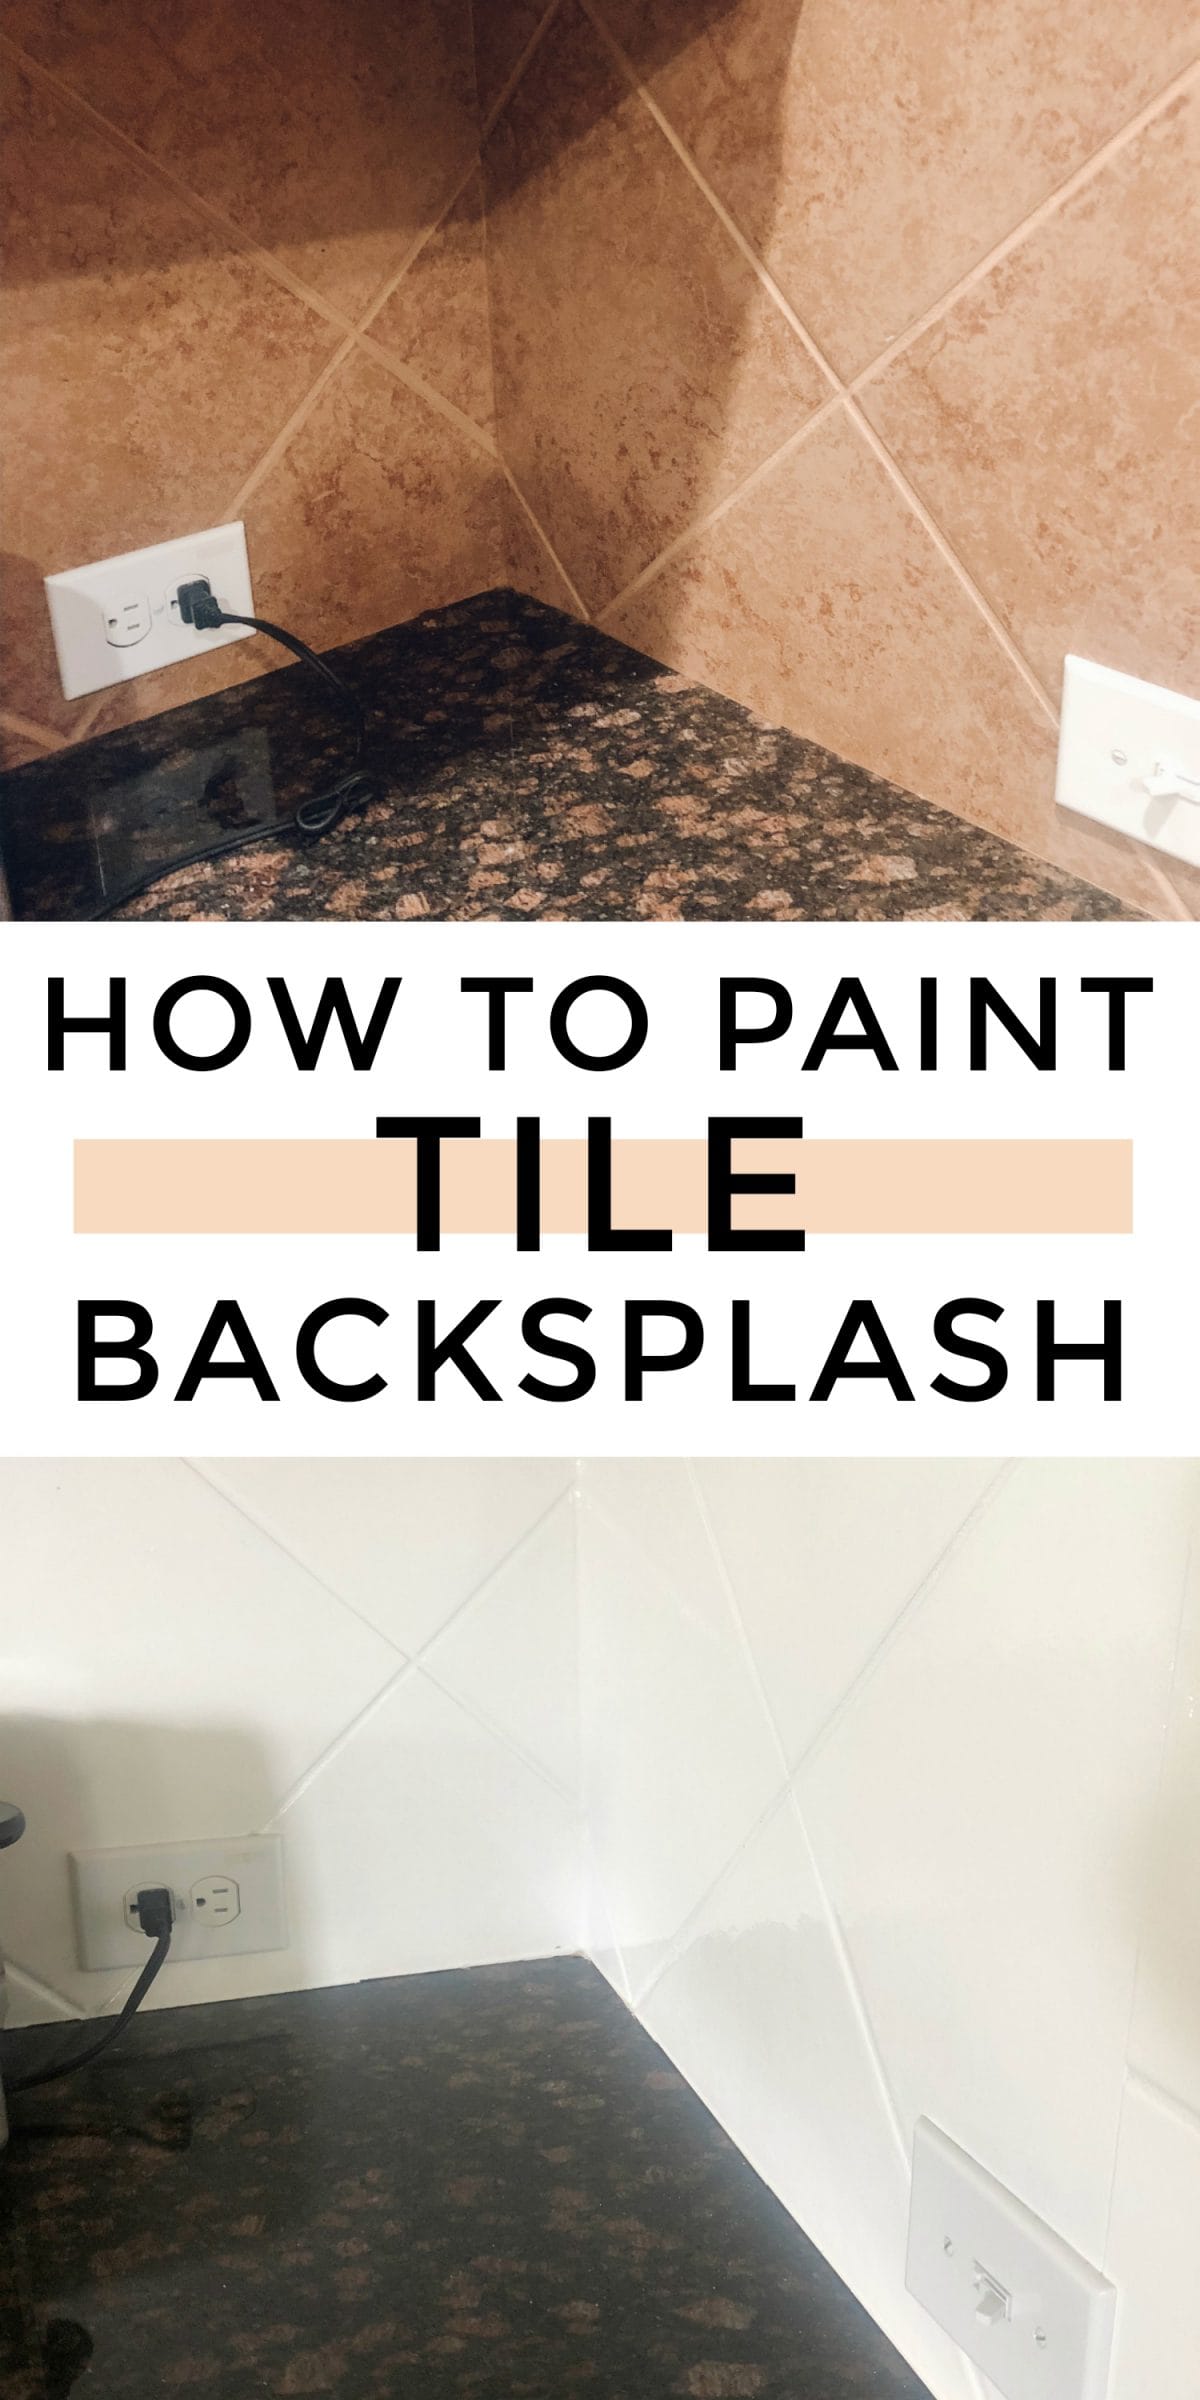
I couldn’t believe how unbelievably easy (yet intense) painting tile backsplash is. You use a white epoxy paint. For this part of my project, I enlisted the help of my friend, Channing, who just painted her bathtub tile. She was a huge help and it was nice to have someone there who understood how this paint works.
We used Homax Tough as Tile Epoxy Brush-on Kit. You roll it on with lint-free rollers (much easier and more even than a brush) and wait 3 hours in between coats. You must finish all of the coats in one day otherwise the paint will not cure properly. This took 4 coats to cover. I ended up doing the last two by myself and I had to stay up til 2 am to make sure it was done within that 24 hours.
WARNING: This stuff SMELLS TERRIBLE. It is intense. You have to ventilate the area you are working in and wear respirator masks when you are painting. It’s best to leave the house in between coats if you can.
Tile Backsplash Painting Supplies
- Homax White Tough as Tile Epoxy Brush-on Kit (we needed 2 kits)
- Lint-free mini rollers
- Mini roller trays
- Painter’s tape
- Plastic tarps
- Respirator masks
- fans (to ventilate)
Before painting, you need to thoroughly clean the tile, otherwise, the epoxy paint will bubble or will not stick completely to the tile. I scrubbed the tile with steel wool and Comet, and then wiped the entire area down again with some Windex. That seemed to work just fine.

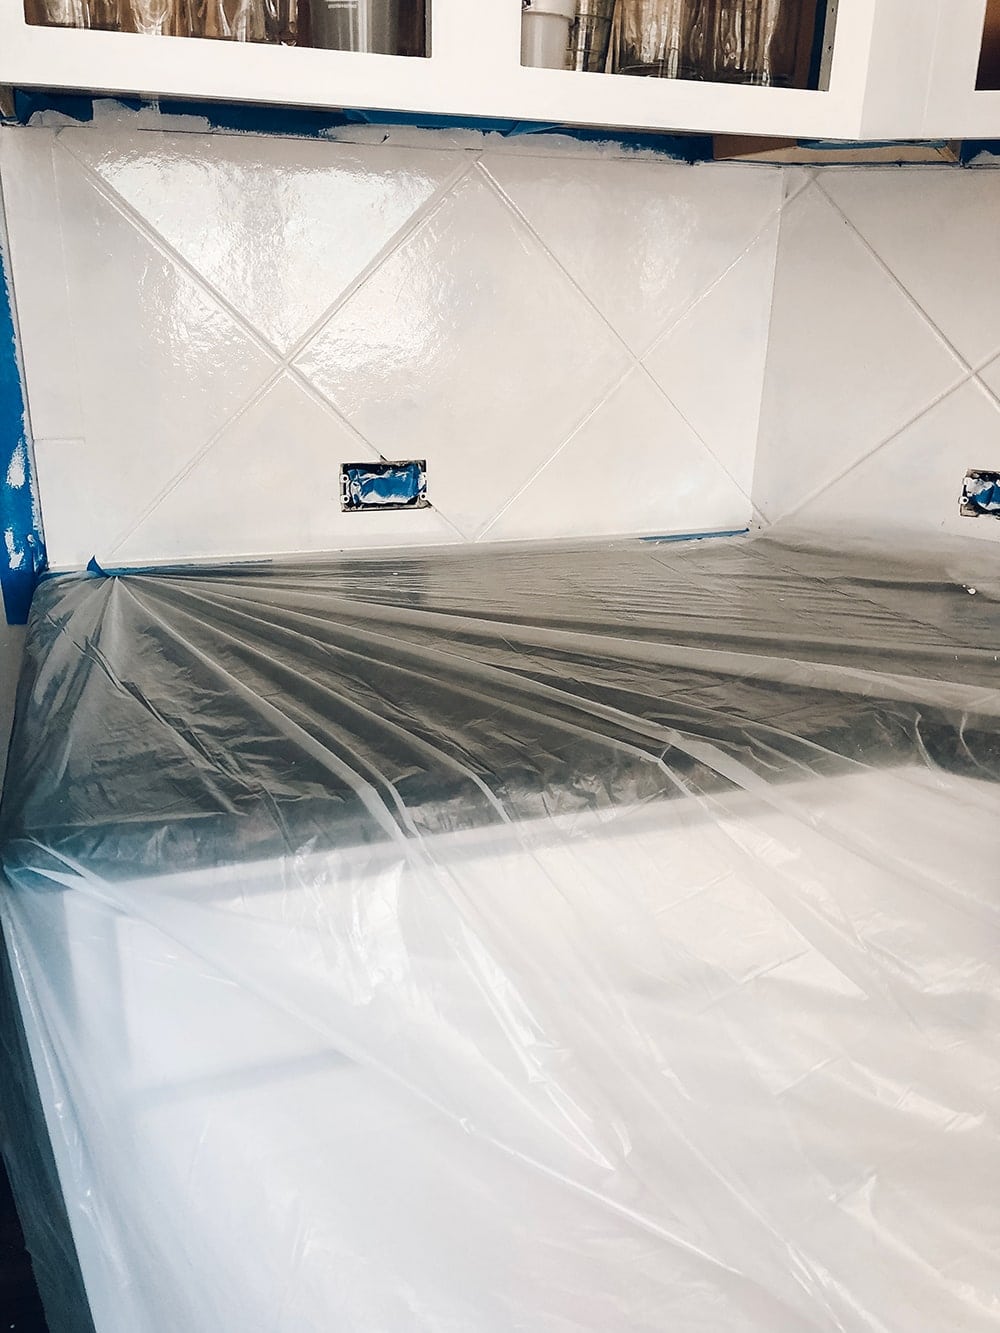
This is what my kitchen looked like when we started painting the backsplash (as you can see, I was still working in sections on my cabinets and not finished). This was after two coats. We brought in a few fans and had to keep the windows open.
Here’s a close-up of how the tile looks once it’s cured. It’s shiny like real tile. You can’t even tell that it’s paint!
Overall, this was a really easy part of the project! You just have to be prepared to commit an entire day to it and make sure the space is well ventilated.
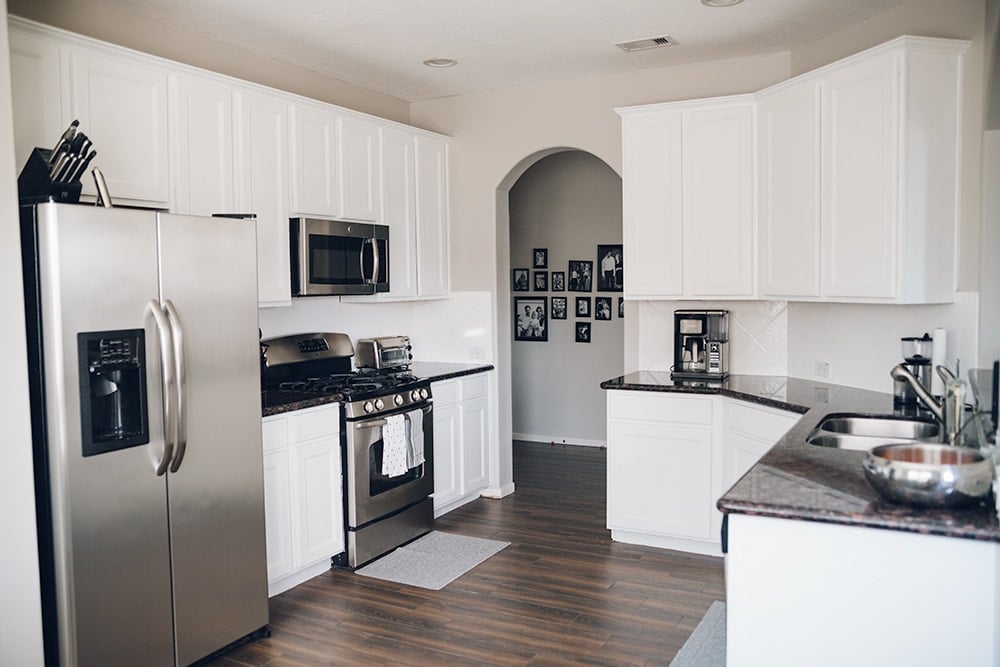
Final Product
Overall, I’m really glad that I took the time out to do this. I’ve gotten so many compliments from people who have come over and visited. They have told me it makes my house look bigger and that it also makes my first floor look brighter.
If I can do it, so can you. Truly. Do your research, plan ahead, and give yourself time. Oh, and give yourself lots of grace. You aren’t a professional painter, and nobody is going to care if there are brush strokes on a cabinet door.
Here are some more photos of my finished kitchen. I absolutely love how much brighter and happier the space feels.

Before and After Photos
Because we all love a good before and after, right? What a huge difference!
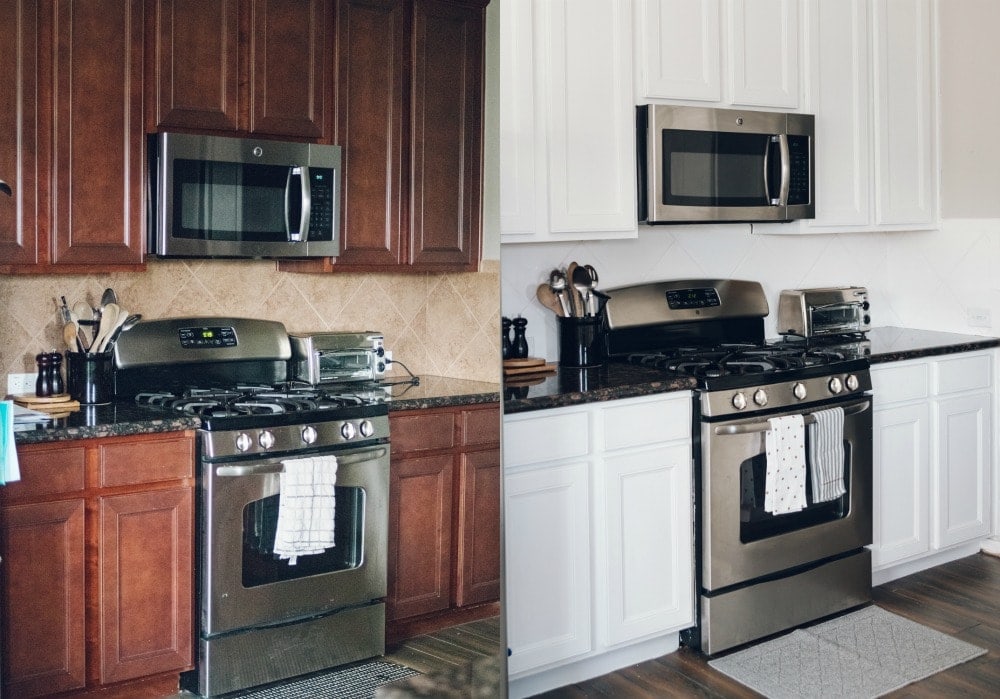
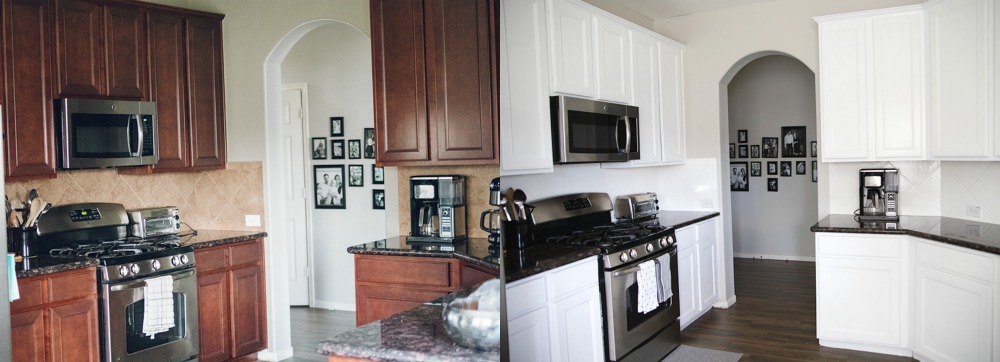
If you’re considering painting your kitchen, my word of advice is DO IT! You will not regret it one bit. And if you mess it up, just call in a professional. Haha.
Hope you found this helpful! I’d be happy to answer any questions you have, but remember I’m not a professional DIYer or Fixer Upper. Just a regular ol’ girl who had an itching for some white paint.


Dang! This looks amazing. I’m so proud of you. What a huge difference it makes.
Is that one paint all you used for the backsplash?? Looks amazing!!
Great job Meg!
Did you use 2 coats of the top coat they provided and then 2 coats of the Behr paint? (To get your 4 coats?) Wanting to do this so bad and love your tips and the way your kitchen turned out!
GREAT JOB!!
Great job with lots of great tips. We will be doing this same thing this summer. One tip for you, we no longer use “master” bath or “master” bedroom. Please try main or primary.
Hi, it looks amazing! I was wondering if you know how well the paint would stand up against water? I have tile in my shower and was thinking about doing this technique. Thanks!
I feel like it would hold up fine! My friend did the same technique to her bathroom over a year ago and it’s held up well!
I have a mosaic tile in the kitchen and i hate it could i paint over this little glass tile to
What do you mean when you say the bond color has to be tinted? Will the people at Home Depot know what I’m talking about? Lol
Thanks!
Yes! They’ll know! Lol! That’s why I think it’s better to buy the kit in the store because they have to tint the paint, even if you get the white one.
We are getting ready to paint of cabinet white with that same kit. You said you bought a gallon of behr white paint with it. Did you do the first coat with what the kit came with and then the other coats with behr paint filled with your top coat? I don’t think we will have enough of the paint that it comes with for our kitchen.
I did use the white in the kit first and then finished up with the Behr because the kit did not have enough paint for as many coats as I needed!!
Your kitchen looks fabulous! I’m getting ready to do something similar. Your link to the epoxy paint goes to Home Depot, but I get a message that the product is no longer available. I found something similar at Lowe’s but wanted to verify it’s the same thing as I was picturing it being a 2 part epoxy, but Lowe’s, Amazon and Walmart only show a One-part epoxy paint (and it has a lot of negative reviews for not setting up properly…) Can you please point me in the right direction? Thanks a bunch! Wish me luck!
Hi Melissa! Good luck on this adventure! I am not a professional and not sure what to tell you here! I think what I’d do in your situation is call either Home Depot or Lowe’s and tell them that you plan to use the paint on tile and ask for a recommendation! I honestly don’t know the difference between 1 and 2 part – that’s how much of a “non professional” I am! LOL
Am I right in my assumption that the product you used was 2 parts that had to be mixed?
No! It was just in a small paint can. I realized my link was broken in the blog post, so I updated it. It’s this product: https://rstyle.me/+lJOb7f2oXSr4olbzhz3mlw
How has this paint kit held up in your bathrooms and kitchen now that it has been a couple years? I’m mainly curious about the kitchen since it’s probably the most used! We used the Deck Rustoleum deck over and it’s awful and right after learned there are lawsuits about it not working for others as well. I’m hesitant to use another product from them again. Thank you!
Did you wash the cabinets at all with TSP or anything similar before starting the process from the kit? It looks so great! We just bought the same kit in the same color and are excited to table the kitchen. Thanks for writing out such a great outline of what to do.
Hi! I was wondering if you could
Link or share the exact roller you used for your back splash? I got the lots but stressing over the roller! Thank you!
I just got a small lint-free roller. I do not remember the exact one I used, but I got it at Home Depot. You’ll be fine!!
My tile looks like yours except I can’t tell if yours is mottled. Mine is a little rough where there are tiny divets and uneven surfaces, made to look natural. I wonder how the very shiny white would look on that? Is your tile perfectly smooth?
What other colors do you think would go good on cabinets than white with the wall color you used don’t really want white cabinets i like the gray colors
I have Sherwin Williams Ellie Gray on my bathroom cabinets and it’s a pretty color!
Hi Meg!
I just came across your blog this morning and it’s fantastic! I am saving this post as we are in the process of purchasing the home we’ve leased the last 6 years and I CANNOT WAIT to change damn near everything!
My question for you isn’t about the cabinets (though I am sure I will have some when we start the process), but about the paint you used on the walls. Agreeable Gray. I am very torn between AG and Repose Gray, which pulls just slightly more gray than AG. Do you find that Agreeable Gray ever appears more beige than gray? I’ve ordered samples from Samplize, but was hoping to get an opinion from someone that has used it and looks at it everyday!
Thank you for any guidance you may be able to provide and I am so happy I found your blog!
I’m glad you found this post helpful! I prefer a warmer gray so I really like Agreeable Gray in my house. I didn’t want anything to pull blue, especially since my house doesn’t get a lot of direct sunlight. I’ve never seen Repose Gray in a house so I couldn’t really tell you the difference! I really think a lot of it comes down to putting some swatches in your house and then making the call. Good luck!!!
This stenciled backsplash turned out so good! I might have to try this technique out! We are having our kitchen cabinets refinished next week so maybe once that is done! Thanks so much for sharing!
Absolutely! My kitchen makeover with capcut apk gave it a spa-like ambiance. The soothing colors and sleek design make it a tranquil space for cooking and relaxation.
I found your blog today, and it’s awesome! I’m saving this post because we’re buying the home we’ve been renting for six years, and I’m super excited to change almost everything!
I have a question about the paint on the walls, Agreeable Gray. I’m torn between Agreeable Gray and Repose Gray, which is a bit more gray. Does Agreeable Gray sometimes look more beige than gray? I ordered samples but wanted an opinion from someone who uses it every day.
Thanks for any help you can give, and I’m really glad I found your blog!